|
|
PDF CH-X400 Data sheet ( Hoja de datos )
| Número de pieza | CH-X400 | |
| Descripción | COMPACT DISC AUTOMATIC CHANGER SERVICE MANUAL | |
| Fabricantes | JVC | |
| Logotipo |  |
|
Hay una vista previa y un enlace de descarga de CH-X400 (archivo pdf) en la parte inferior de esta página. Total 30 Páginas | ||
|
No Preview Available !
CH-X400 / CH-X450
SERVICE MANUAL
COMPACT DISC AUTOMATIC CHANGER
CH-X400 / CH-X450
Contents
Safety precaution
Important for laser products
Location of main parts
Removal of main parts
JC 12 Forced eject procedures
Area Suffix
CH-X400
J Northern America
E Continental Europe
CH-X450
U
Other areas
1-2 Troubleshooting
1-3 Wiring connections
1-4 Pickup replacement procedure
1-5 Description of major ICs
1-19
1-20
1-26
1-27
1-29
This service manual is printed on 100% recycled paper.
COPYRIGHT 2000 VICTOR COMPANY OF JAPAN, LTD.
No.49585
Dec. 2000
1 page 
CH-X400/CH-X450
Removal of main parts
Disassembling procedures
Perform operations according to the items to be disassembled.
Replacement of the Pickup
1. After removing the exterior (top and bottom)...
2. Proceed to the "Pickup Replacement" section.
3. When applying grease, refer to the Exploded View.
Use new grease.
1
Mechanism section
1. Remove the exterior (required section only).
2. The mechanism section is designed so that each unit can be
removed separately.
3. When reassembling, refer to the assembling precautions.
(Use new grease when applying grease.)
1
Exterior section
Removing the bottom cover and front panel
assembly
1. Remove the screw (1-a) to unlock the mounting direction
knob located on the side of the main unit.
1
2. Turn the mounting direction knob in the direction of the arrow
using a coin, etc. to remove it. (The knob can be removed
only when it is set to this position.)
3. Remove the four top cover fixing screws (1) at the triangle
(A) marks on the side of the main unit. (Perform the same
operation on both sides.)
4. Turn the unit upside down so the bottom surface is facing
upward.
5. Lift the rear edge of the bottom cover slightly and lift the side
by grasping the DIN jack section on the side panel, then
turn it toward the front (raise upward) to remove the bottom
cover.
6. Unhook the four catches located on both sides of the front
panel, and turn the front panel toward the top cover (lower
down) to remove the front panel.
Remove 1-a and
turn in the
direction of the
arrow
1
1-a 1
Fig. 1
Remove 1-a and
turn in the direction
of the arrow.
1
1-a 1
1
Fig. 2
The front panel can be
separated by raising the
cover.
Unhook catches
Fig. 3
Slightly lift the
jack section to
remove.
Unhook catches
Fig. 4
1-5
5 Page 
CH-X400/CH-X450
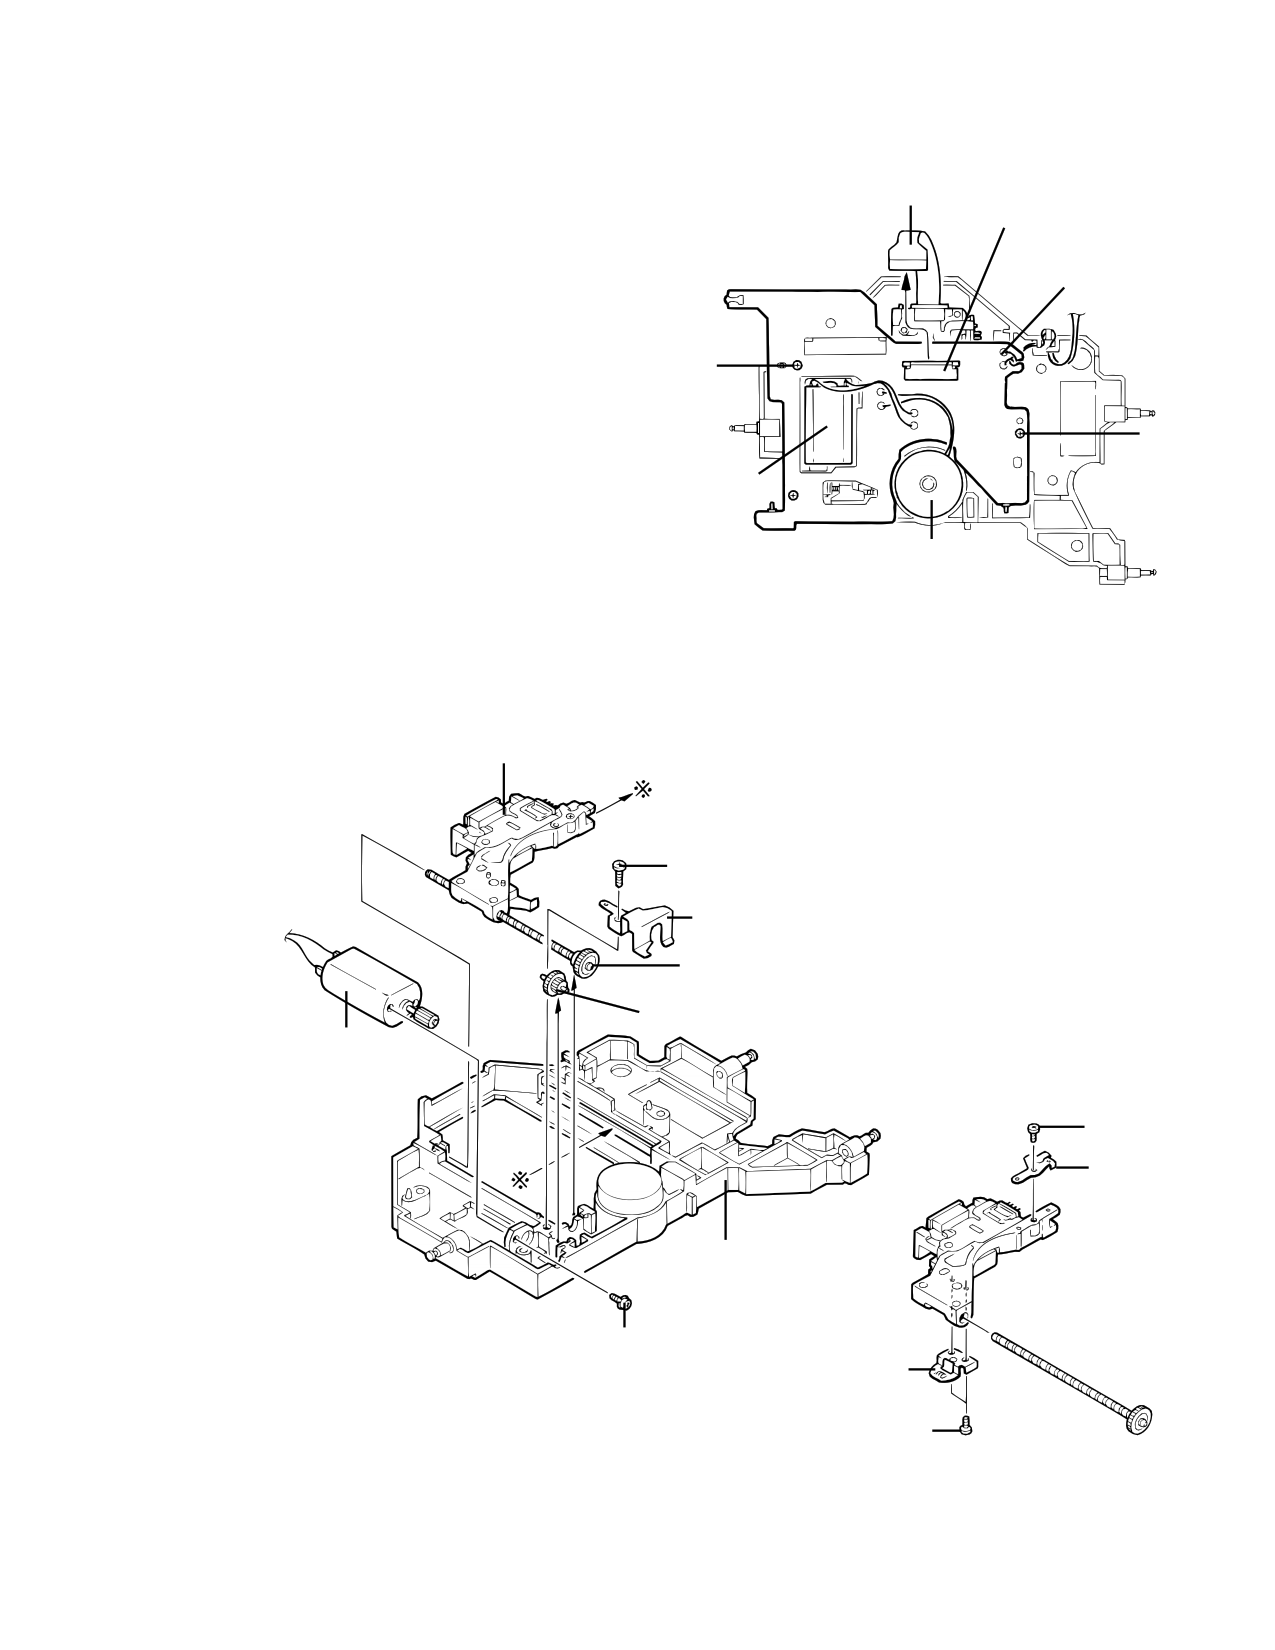
Pickup assembly
1. Remove the three mechanism PCB fixing screws (6) located
on the back of the traverse mechanism.
2. Disconnect the two feed motor wires (blue and white), two
spindle motor wires (red and black) and two tray motor
Pickup flexible PCB
wires (brown and black) that are soldered to the mechanism
PCB assembly.
Pickup: Remove
after shorting
3. Short-circuit the grounding point on the mechanism PCB
assembly, and lift it with the flexible PCB attached to
connector CN501.
Next, short-circuit the grounding point on the pickup unit
and disconnect CN501.
6
4. Remove the screw (7) to remove the feed motor assembly.
5. Remove the screw (8) to remove the shaft holder retaining
the feed slide shaft assembly and the middle gear.
6. Remove the middle gear.
7. Move the pickup assembly upward from the gear section Feed motor
and remove it from the traverse chassis assembly.
8. Remove the two screws (9) to remove the rack arm.
9. Pull out the feed slide shaft assembly.
10. Remove the screw (10) to remove the spring.
Spindle motor
CN501
Tray motor wire
6
Note: Before replacing the pickup, be sure to short-circuit the
grounding points. First short-circuit the PCB section and
then immediately short-circuit the pickup section.
Fig. 23
Grounding point
Pickup assembly
Grounding point
Feed motor
8
Shaft holder
Feed slide shaft assembly
Middle gear
Remove gears and
motors only when
required.
10
Chassis
Fig. 24
7
Pull out
Rack arm
9
Fig. 25
1-11
11 Page | ||
| Páginas | Total 30 Páginas | |
| PDF Descargar | [ Datasheet CH-X400.PDF ] | |
Hoja de datos destacado
| Número de pieza | Descripción | Fabricantes |
| CH-X400 | COMPACT DISC AUTOMATIC CHANGER SERVICE MANUAL | JVC |
| Número de pieza | Descripción | Fabricantes |
| SLA6805M | High Voltage 3 phase Motor Driver IC. |
Sanken |
| SDC1742 | 12- and 14-Bit Hybrid Synchro / Resolver-to-Digital Converters. |
Analog Devices |
|
DataSheet.es es una pagina web que funciona como un repositorio de manuales o hoja de datos de muchos de los productos más populares, |
| DataSheet.es | 2020 | Privacy Policy | Contacto | Buscar |
